Archive for the ‘good to know’ Category.

Samba (cifs) through SSH

Ever needed to work from home, but have the problem of using a Samba share on the server while at work, but not at home? Well here is a simple fix.

In my example I’m working on a “sandbox” from home. The folders I work in have files with more than one owner. This becomes a nightmare even when I ssh in. Some might think an NFS share would be better. Unfortunately with NFS you are stuck with the current file permissions. With Samba those file permissions are given to you. That may sound a bit confusing, so let me try to clear it up a bit. Let us say there is only one file in the Samba share. User “ender” has ownership of the file. I can’t alter it. When I login with Samba the file appears to be owned by me not “ender”. Now I can do my work and when I log out the file is still owned by “ender”… wow, I don’t think I did a good job there either. Lets just say that when in comes to file permissions, Samba is the way to go.

But I need to work over ssh? Only port 22 is open from the outside. No problem!

We simply need to create a ssh tunnel. For this we already know we need to connect to port 139 on “sandbox”, and we need a local port to connect to. I would say just make it 139 also. Unfortunately for me I’m also running Samba on my local machine, and I can’t do that. So any non used port will do. How about 1139?

ssh user@remotehost -L 1139:localhost:139

Simple as that. That will connect port 1139 on your local machine to 139 of the remote host. The “localhost” actually refers to the remote host. It’s saying connect 1139 to my local machine to the remote host’s “localhost” port 139. If you are actually connecting to a windows box on that network you can “bounce” off the linux host to the windows. For more information you can refer to a previous post: Secure VNC for free for more information.

Now comes the fun part. You have 1139 on your local machine tied to 139 on the server. Now to mount the share as a local disk.

As root we mount the share.

mount -t cifs //sandbox/www /mnt/sandbox/ -o username=<username>,password=<password>,ip=127.0.0.1,port=1139,uid=<your local UID>,gid=<your local GID>,file_mode=0770,dir_mode=0770

Fill in your Samba share’s username and password, then your local machine’s UID and GID. To find the UID and GID type:

cat /etc/passwd | grep <your local username>
cat /etc/group | grep users

This assumes your regular user is part of the “users” group.
It will show 2 numbers. UID is most likely 500 or 1000, and GID is likely to be 100.

After filling in the blanks hit enter and your set! This will use the local port 1139 through the ssh connection to 139 on the server. It may seem a little slow at first, but that may be from the old server I’m connecting to.

If you want to store the info in fstab try:

//sandbox/www    /mnt/sandbox     cifs        noauto,rw,username=<username>,password=<password>,ip=127.0.0.1,port=1139,uid=<UID>,gid=<GID>,file_mode=0770,dir_mode=0770          0   0

Now for some reason I can’t quite get this to work, but others seem to have no problem with it. You can add the mount line above into your /etc/fstab file so a regular user can mount. I did this, but it doesn’t work for me. I get an error saying “only ROOT can mount this”. If you get this error try:

chmod +s /usr/sbin/mount.cifs
chmod +s /usr/sbin/umount.cifs

Like I said, it didn’t work for me, however after creating the ssh tunnel I simply open a new terminal window, su to root and then type “mount //sandbox/www” and it works fine.

Also, the reason I don’t background the ssh connection is because if it drops you may run into some problems with trying to mount it again (or even trying to use umount). I had this problem and it gave me a head ache to try to fix it without just rebooting. I’m sure I could have forced an umount.cifs, but I didn’t try (actually I didn’t realize it was actually still mounted). When logging in I recommend running a command that continuously sends data like “top”. That will help prevent the connection from being lost. If the connection is lost you must umount the share, reform the ssh tunnel, and try again.

NOTE: If you are connecting to a share on a Windows 7 box you must open 2 ports, 139 and 443 (or so I’m told). To do this open up a few terminal windows and create two separate connections. After that I do not know as I have never tried.

EDIT NOTE: I wrote this some time ago and just now got around to posting it. I hope everything works fine for you as the mount works fine for me (except under fstab for some reason). Don’t forget that by typing the command into the shell it will be stored in your history. If the password is sensitive I would recommend clearing out your history after mounting the share.
An Interesting Conversation About Computer Security

A few days ago I was with one of my good friends who owns a computer repair shop. I love going there because he always has something new and cool to show me (and I get to change to “geek out” for a bit), plus I like helping out so I don’t forget how to fix even the most basic computer problems. While there, a long time customer of his came in to pick up his computer and a very interesting conversation came up. The customer asked why his computer won’t stay clean after bringing it down to the shop.

It’s an interesting thing isn’t it? Why is it that we as admins and security experts and never seem to keep computers clean? Even the most skilled professionals can’t keep a computer clean. Well, it’s not our fault. There are so many security issues out there, and to be very blunt, the bad guys are always one step ahead of the security experts. Sometimes the good guys get a patch out (or publish the exploit) before the bad guys get a chance to exploit the security hole.

Unfortunately even when the good guys find the security hole before the bad guys there is the problem of getting the OS patched before someone becomes a victim. For example, a short time ago there was an ActiveX Draw exploit that affected millions of Windows PCs. Basically the bad guys somehow gained access to Google’s Adsense archive (and several other advertiser’s archives) and “infected” roughly 20% of the ads in the archive. I’m unsure of how the exploit functioned. I have heard everything from nothing to allowing someone to gain full control of your computer. Now, lets say for example that you visit a site, any site. You usually have two ads. One along the top and one down the side. So with one page view you have seen two ads. You click on something, new page, four ads have now been seen. You click again, six ads. Now you have reached the mark. There is a high probability you just saw one of the exploited ads. Whether you like it or not what you see in your web browser is also stored locally on your computer. No one was at fault with this (excluding the bad guys). Microsoft put out a patch after about a week of the exploit being known and Google fixed the hole allowing the bad guys to gain access to the Adsense servers. The problem now? Actually, two problems. One, some people are still making ads that are infected and trying to get them onto your computer. Two, there are still millions of computers that have not been updated.

There are always problems like this. I never like to blame any company directly unless they know of the issue but don’t bother fixing it. Other examples include more advanced techniques. You can gain access to a computer by sending certain information to it causing a hole to open temporarily.

The $1000 question is how do we keep out computer clean. Everyone has their own ways, but we came up with just a few basics. So if you run Windows try these out: Run FireFox instead of Internet Explore. Within FireFox get the extensions Adblock Plus and NoScript. Make sure you have a good Virus Scanner and it’s up to date. Turn on Automatic Windows Updates and keep your Windows up to date. Get anti-spyware programs like Adaware (the free one is fine for me) and Spybot: Search and Destroy. Make sure you have a firewall even if it’s the one built into Windows XP (or later), and lastly, be sure your not connected directly to the internet. Most ISPs will provide you with a modem or router, make sure you have a router even if it has the modem built in! It adds just that slight bit of extra protection.

Granted, those are just a few of the things you can do to keep your computer clean. I always recommend talking to an expert when wanting to try new software. If you feel your computer may not be clean find a “hole in the wall” style computer shop. Those are often the better choice compared to the larger companies. Ask questions to the shopkeep. Will they charge you even if they don’t fix the problem? Do they guarantee their work for at least 30 days? Will they wipe your computer’s hard drive or remove personal files without asking? Will they look at your personal files or web history? The best repair shops will answer honestly and quickly. Hesitation is a bad sign.

Lastly for all your Windows users out there. Get a program called Secunia PSI. It is free for home users. This program will check almost every piece of software on your computer and see if there is an update for it. It works very well. For example a few weeks ago Adobe was consistently updating their Flash Player because of several security holes. Secunia PSI found the version I was running was insecure and provided me with a link to directly download and install the updated version! I must say it has been one of the best security programs I have seen for some time.

P.S. Just a note about NoScript. It can be hard for some users to get accustom to using it, and if you unblock the wrong script you will get infected.

Using SSH as a secure proxy

Recently I started school (which is why I haven’t done much of anything on my sites) where they have a wifi connection just like at a coffee shop. The problem with these open networks is that people (like myself) can run a packet catcher like WireShark and get user names and password for various sites such as yahoo, facebook, and myspace. Since when you log in to those you are doing so without https (encryption). Also my school logs every site to visit and when I’m bored in class I don’t want them to know I’m researching hacking sites.

To solve this I setup a Linux box on my network and point port 22 to it. 22 is the default SSH port in case you didn’t know. Then I create a secure tunnel from my laptop to my home box (my laptop also running Linux).

SSH -D 1080 username@ip

This creates what is essentially a SOCKS v5 proxy on port 1080. Anything and everything you do remotely can be routed through 1080 (any port works, I just like that number).

Now I don’t know how to setup my Linux machine so that I don’t need to configure every program I use to work with the proxy and currently have to setup everything manually. Here is how to do it with FireFox.

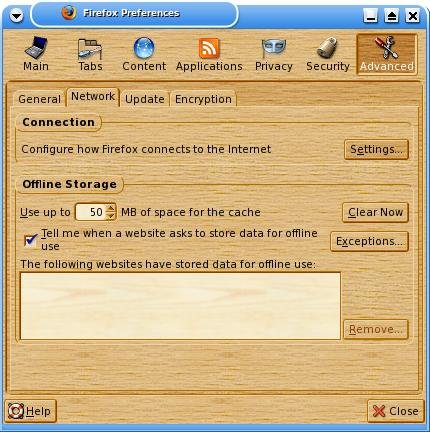
Open FireFox, goto Edit –> Preferences –> Advanced –> Network –> Connection –> Settings
pic1
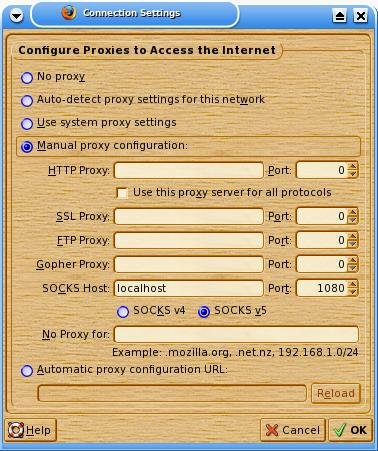
Click “Manual proxy configuration:”, then under SOCKS Host put “localhost” port “1080” and make sure that SOCKS v5 is clicked.
Where it says “No Proxy For” you can leave localhost in, I’m not really sure, never tried. I just cleared it out and everything went smoothly.
pic2
Close the window and start surfing!

As long as you keep the SSH connection alive this will work. If you SSH connection does die you will know right away when you can’t surf. You will also need to revert your connection settings back when you are no longer using the SSH proxy. Also keep in mind that even tho you are routing via an encrypted tunnel to your remote machine, traffic will still be unencrypted after that point. Surfing may take longer than you would like. This is due to the fact that ALL traffic will be routed first to your remote machine then to you via the tunnel.

Lastly, I’m told that not every SSHd configuration allows SSH proxies. Mine does. I’m not sure why, I haven’t bothered to look into that yet. You may need to check your /etc/sshd_config file as there may be an option there. If you need help you know where to ask for it. Enjoy!

Secure VNC for free

Here are my instructions on how to get VNC in KDE 3.5+ working through an SSH tunnel. It’s easier than you might think.

To start all you need is 2 or 3 Linux machines with OpenSSH installed. Most distros come with it (although I know Ubuntu does not).
NOTE: All my machines run Slackware 12.0 or higher.

Step 1 – Setup the host.
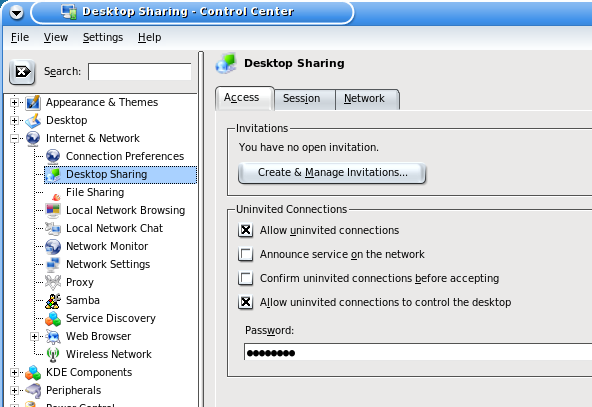
This is fairly simple, open up you Control Center, and find Desktop Sharing. Just look at my picture below and see the settings I would recommend for this.
settings
Just make sure you set a STRONG password!

Now comes the fun part. Creating the SSH tunnel. By default the VNC connection is on port 5900.
For this example you have 2 computers. Your at a coffee shop with free wifi but your smarter than everyone else, so your going to use encryption to your home desktop and surf the internet from there.
Your home computer (lets say) has a domain name. For my examples it will be daijoubu.net, and your internal computer is 192.168.1.2.
Make sure you set your router to forward port 22 (the SSH default) to 192.168.1.2
Open up a terminal (some times it’s called Konsole) and type:

ssh dkun@daijoubu.net -L 5931:localhost:5900

The user name I’m using is dkun, just put in your user name
You will be prompted for your password, after entered you have formed the SSH connection. What this command does is it takes all traffic from your desktop port 5900, and forwards it to your laptop (at the coffee shop) to localhost port 5915.
Seems complicated, but trust me, it works!
Now open up Krcd and type

vnc:/localhost:5915

Just as shown below.
window1
If you have 3 computers. For example, you don’t forward to your desktop (for security reasons) but you do forward to a file server. Lets say your file server is 192.168.1.3 and your desktop if 192.168.1.2 type:

ssh dkun@daijoubu.net -L 5915:192.168.1.2:5900

This will form the SSH tunnel to your server (192.168.1.3) then forward port 5915 from 192.168.1.2 through the SSH tunnel back to you.
Reminder: Doing it this was results in plain text from 192.168.1.3 to 192.168.1.2. This is only a problem if you don’t trust your internal network!

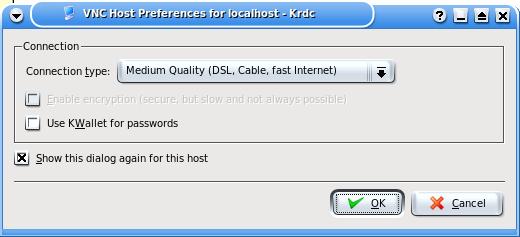
From here is gets simple, after you click Connect you will be prompted for the following window.
window2
These are the settings I recommend for over the Internet, VNC can take a lot of bandwidth.
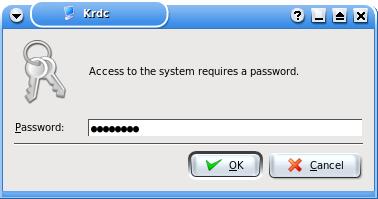
Next you will get a password prompt, type in your password and hit OK
window3
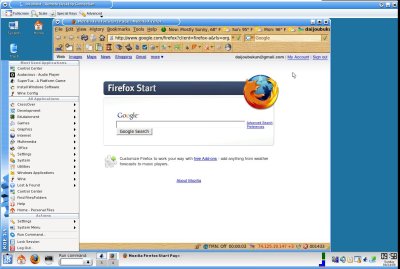
Your remote desktop will appear! if you look quickly you will see this at the bottom right of the screen
window4
That’s it! Now you can use your remote desktop over a secure connection!
window5
WARNINGS! If you attempt a connection without the SSH tunnel your passwords will be sent in plain text! That is BAD!
DO NOT FORWARD PORT 5900 ON YOUR ROUTER!

Extra Notes: If you do not have a domain name to work off of, you can put in an IP address after the username@, make sure it’s an internet IP address, 192.168.1.2 will NOT work
If you don’t have a static IP address you can use dyndns to get you one. They are really good, but if your IP changes you will have to update your opendns account. I would recommend checking before you head out.

Special Thanks to Spyder_3lite of UCoD.com. If it weren’t for you showing me something way cool with SSH, I never would have been able to do this.

Note: This was originally written on my other site Daijoubu.net. I have moved it here for better indexing from Google. ^_^