Archive for the ‘good to know’ Category.

How To Update a Live Website via SVN

Do you want to use SVN to update your website? This guide will help you and includes information not found anywhere else on how to get it working. Many websites give basic information and comments complain about it not working. If those other website didn’t work for you. This will.

After digging around for hours and seeing everyone complain about having the same problems after being told the same solutions, I decided to figure it out for myself. If you read this carefully you too will have a website setup that can be updated via subversion.

Getting Started

I’m going to assume that your SVN server and website are on the same machine and that you are using Apache to serve both. I’m also going to assume that you are somewhat familiar with SVN and Apache. I’m not going to go into much detail on how to get everything setup from scratch.

The tools you will need to have installed are as follows (may need more depending on your configuration). Apache HTTPd, Subversion, and gcc.

Many Linux users and distributions use sudo. I do not, and I will not provide information on how to use sudo. My recommendation, before doing anything, is to type sudo su which will make you root. Do everything from there so you don’t have to sudo anymore.

Setup a new SVN repository

Alright, now we are going to setup the new SVN repository. This can be done easily with:

svnadmin create <path to repository>

Place it in a good location that you will remember since you need to point Apache to it. In my examples we are going to use /home/www/domain/svn/website/ for our project location and /home/www/domain/htdocs/ for our website.

For user access controls I use a 2 part process. I have an authz and passwd file in the root of my SVN directory (/home/www/domain/svn/). The reason I do this is because I host several SVN projects and I don’t want everyone to have access to everything. This way I can also setup (this comes later) Apache to have read-only access to the repository.

First, we need to create our authz and passwd files. Lets call them svn.authz and svn.passwd so we know what they are for.

In the svn.authz file we need something like this:

[groups]
project = dkun
other1 = dkun, someguy
website = dkun, friend1
readonly = redmine,apache
 
[project:/]
@project = rw
@readonly = r
* =
 
[other1:/]
@other1 = rw
* =
 
[website:/]
@website = rw
@readonly = r
* =

Looks a bit overwhelming. Let me explain.

Starting from the top, we have [groups]. These are groups of users that we give project names to. Notice that 2 of the projects have more that one user. There is also a read-only group. You can name the groups what every you want. I do it by project name to make it easy to read.

After that you see [project:/]. This is the project group. It has one user and is set to read/write. It also has a readonly group. This way I can setup both Apache and Redmine with read only access.

Lastly you might have noticed *=. What is that? It turns off anonymous access. So unless your project has code going out to the web, make sure to put this in.

Now we need to setup the svn.passwd file. This is pretty easy. Just type:

htpasswd svn.passwd <username>

You will be prompted for the password. That’s it! Pretty easy right? Just don’t forget to setup the user apache (keep it lower case, trust me), and any others you might need.

Setup Apache

Now that we have SVN and out new project setup, we need to configure Apache to serve everything. Setup your VirtualHost to point to where you want your website to be hosted from. So for me it would be /home/www/domain/htdocs/. I’m going to assume you already know how to do this. All you need to add is a little directive.

<DirectoryMatch "^/.*/\.svn/">
     Order deny,allow
     Deny from all
</DirectoryMatch>

This will stop someone from browsing your .svn folder on the website.

Now setup an SVN VirtualHost. This gets a bit more complicated. I’m going to avoid going into detail here. I want to assume you have some background.

In your Virtual host we need to set a few options and point to the SVN repository root. Here is an example of the options you need to put inside the VirtualHost section for SVN to work. Don’t forget to set other items you need!

<Location /svn>
   DAV svn
   SVNParentPath /home/www/domain/svn
   AuthType Basic
   AuthName "My SVN Repository"
   AuthUserFile /home/www/domain/svn/svn.passwd
   AuthzSVNAccessFile /home/www/domain/svn/svn.authz
   Require valid-user
</Location>
<Directory /home/www/domain/svn>
   Options +Indexes FollowSymLinks +ExecCGI
   AllowOverride AuthConfig FileInfo
   Order allow,deny
   Allow from all
</Directory>

Note all the directories. Change them to match your server. Also, verify that your SVN modules are enabled in Apache. They should be in your apache.conf or httpd.conf (depending on your server). You will need to enable:

LoadModule dav_svn_module lib/httpd/modules/mod_dav_svn.so
LoadModule authz_svn_module lib/httpd/modules/mod_authz_svn.so

That’s it! Now type apachectl configtest and you will get messages back if there is a problem in your Apache config. If it is a warning about your website directory missing, don’t worry. Just create the directory and give full ownership to the apache user (We will get back to this in a moment).

Before continuing, restart Apache with apachectl restart and make sure your SVN works! If it does not then the next section will fail.

Do some weird stuff with Apache

Here is where things get a little weird. This is also where 99% of people fail because there is no good information out there. I will do my best to explain what to do and why you should do it.

The first step is you need to find out what user and group Apache runs under. For me, both are apache, but for you it could use www or www-user. You can find this by checking /etc/passwd and /etc/group, or by going through your apache.conf file and look for User and Group directives.

Now look in /etc/passwd for the apache user. The second to last option shows Apache’s home directory. In my case it is /srv/httpd. Go to that directory and type:

chown apache.apache ./

Set the user and group to which ever Apache runs under. This will allow Apache to create new directories there without changing ownership of anything else. Also, that is just one (1) period before the slash!

Open /etc/passwd and find the apache user again. At the end of the line you should see something like /bin/false. This keeps the Apache user from logging in. This is for security reasons. We are going to temporarily change it to /bin/bash.

Now that you are already root, type:

su – apache

Once again I assume your Apache’s user is apache. Adjust as needed.

Now you are logged in as the Apache user. You should see a new shell and be ready to go. Make sure you are in the /var/httpd directory (as stated previously as being Apache’s home directory) by typing pwd. If you are, then you have created a new session and are ready for the next step.

Navigate to the directory where the website will be served from. So if the website is in /home/www/domain/htdocs/ then go one level up; /home/www/domain/. Now we are going to perform an SVN checkout and have subversion remember our credentials.

svn co http://<domain>/svn/website

Adjust the http directive as needed. If you use SSL have subversion permanently accept the certificate. You should see a prompt for apache’s password. This is the password you created for it in svn.passwd. Type it in and when asked if you want to store the password, say yes!

If everything went as planned then you should see a successful checkout as revision 0. If not… well you did something wrong. Double check your paths, apache config files, and passwords. If needed, you may need to give ownership of the directory to Apache so that user can create a new directory and write to it.

Check to make sure a .subversion directory was created in Apache’s home directory and that there is a .svn folder in /home/www/domain/htdocs/. If now you need to give ownership of that directory to the Apache user (you will have to be root for this). If there is so .svn directory, then change ownership of the htdocs directory to Apache and run the checkout again.

If everything went smoothly then we are done as the Apache user. Type logout to return to being root.

Last thing. Open up /etc/passwd and change /bin/bash back to /bin/false. No need to have a security hole.

Create an executable

Now that we have SVN, Apache, and a SVN checkout setup, we can finally finish this. The first thing you need to do is find where svn is located:

whereis svn
svn: /usr/bin/svn /usr/man/man1/svn.1.gz /usr/share/man/man1/svn.1.gz

As you can see, I used whereis to find the svn executable. It’s the first one, /usr/bin/svn.

Navigate over to the htdocs directory. Open up your favorite text editor and dump this in it:

#include <stddef.h>
#include <stdlib.h>
#include <unistd.h>
int main(void)
{
   execl("/usr/bin/svn", "svn", "update", "/home/www/domain/htdocs/",
      (const char *) NULL);
   return(EXIT_FAILURE);
}

See where the directives of /usr/bin/svn and /home/www/domain/htdocs/ are? Just change those to match your server. Save the file as update.c and just back to the shell.
Now we need to compile the program:

cc -o update update.c

This will create an executable called update. You can call it what ever you want, just as long as before renaming it you type chown apache.apache update; chmod +s update. It should be owned by the Apache user.

Setup post-commit

Just over to your SVN repository, then into the hooks directory. So if you were following, cd /home/www/domain/svn/website/hooks. There you will see a bunch of .tmpl files. Rename of copy post-commit.tmpl to post-commit, then chmod 755 post-commit.

cp post-commit.tmpl post-commit
chmod 755 post-commit

Open post-commit in your editor. You may see a bunch of stuff in there. Just put a hash (#) sign in front of any other commands there. They are examples. Add:

/home/www/domain/htdocs/update

That’s it. Don’t add sh, or bash to the front, just put in the path with executable at the end. Save and exit.

Try it!

Now, as long as you followed along and I didn’t skip anything. This should work. Try it out. Try committing something to SVN and see what happens! If you can view the website right away, they you did it correctly. If now, you should check your apache log files. Specifically error_log. If SVN threw an error you will have to see what went wrong there. Sometimes just putting a commit message in will fix any error.

That’s it. I hope you found this informative. Please feel free to drop my a comment below if you have anything you wish to add or just want to say thanks for the info. I appreciate all feedback. Thanks for reading!

How to use Redmine when your Ruby is too new

Recently my work switched to Redmine to keep track of our projects and such, I loved it so much, I wanted to use it at home for my personal projects. Seriously, if you have never used it, give it a try, you won’t be disappointed. However, there is a problem that I ran into when setting it up at home, my Ruby was too new! At the time of this writing Redmine version 1.2.2 was the current stable, and required Ruby 1.8.6 or 1.8.7. My server came with 1.9.1! I could either downgrade and risk possible incompatibility problems, or I could take another approach. After days of Goggling, I found a solution.

Check out https://rvm.beginrescueend.com/rvm/install/

I recommend the single user install. I did it with no problems. Things get a bit tricky when using RVM, so I decided to create this Quick and Dirty Guide.

How to Install and Setup Redmine with RVM

Be sure to pay attention to directories, I will make notes to help make things easy. Also, I recommend trying this out in a VM or a dev box. Please read the HowTos on redmine.org and do some research and testing before following this guide.

Note: This was done running Slackware 13.1. I do NOT use sudo on my machines. If you get a permissions error you can use sudo if your Linux distro is setup for it. The first part of this I did as the root user. If you use sudo, type ‘sudo su -‘ to become full root. If you see Redmine (with the capital R), I’m referring to the Redmine program or website. Lowercase, is the user redmine.

After downloading the source from redmine.org extract it and rename the folder to redmine, you don’t have to do this, it’s just how I did it.

Setup a Redmine user

This user doesn’t need remote access, or the ability to login directly. We are going to create a new user and group for Redmine to run under.

groupadd redmine
useradd redmine -g redmine -m

Now set permission to where you extracted Redmine to. We are going to give everything to the redmine user and group.

chown redmine:redmine redmine/ -R

Now you need to su – redmine. Make sure you are in the redmine user’s home directory. Usually /home/redmine/

Setup RVM

Now that you are the redmine user and in their home directory, it’s time to install RVM. Be sure to check out their website for full and up to date information. The information listed here maybe out of date!

Lets install RVM for single user use. You are welcome to use the multi-user version, but this way worked just fine for me. Once again, make sure you are in the redmine user’s home directory.

bash < <(curl -s https://raw.github.com/wayneeseguin/rvm/master/binscripts/rvm-installer )

This will get the installer going. Once it finishes, run this:

echo '[[ -s "$HOME/.rvm/scripts/rvm" ]] && . "$HOME/.rvm/scripts/rvm" # Load RVM function' >> ~/.bash_profile

Now logout. Log back in as the redmine user. and type:

type rvm | head -1

You should get back rvm in a function. If not, something went wrong. Try the commands listed above again. If you get an error about a broken pipe, don’t worry about it. I got it once, but never again. I have no idea why.

If you do get back the good news type:

rvm install 1.8.7

This will install ruby 1.8.7! Once it is complete type:

rvm use 1.8.7

If you don’t get back any errors, type:

rvm use 1.8.7 --default

This will set that ruby version as your default (only for the redmine user!) RVM is now setup. Good job!

Install Some Ruby Gems

Now that RVM is setup and Ruby 1.8.7 is installed, we need to setup some gems for ruby. First step is getting the correct version of RubyGems installed. As per the Redmine documentation, we want version 1.3.7. I find the easiest way of doing this is to grab their .tgz file. Once you get it (you can also find a list of versions available for download here. Extract it, and run setup.rb.

wget http://rubyforge.org/frs/download.php/70696/rubygems-1.3.7.tgz
tar zxf rubygems-1.3.7.tgz
ruby rubygems-1.3.7/setup.rb

It should only take a second or two to install. Once it’s complete there are two more gems that need to be installed before continuing. It is easy and straight forward. Note: If your system appears to freeze when running the commands below, do not worry. It’s working in the background a may take a minute or two.

gem install rails -v=2.3.11
gem install -v=0.4.2 i18n

Setup MySQL

Assuming you are still the redmine user and MySQL is setup and ready to go, these next steps are very easy and were taken right from Redmine’s website. Follow the steps below.

mysql -u root -p
create database redmine character set utf8;
create user 'redmine'@'localhost' identified by 'redpass';
grant all privileges on redmine.* to 'redmine'@'localhost';
flush privileges;

Take note of redpass. Change it to the password you want to use!

Log out of MySQL and stay logged in as the redmine user. Change directory to where the redmine program is stored. For this example, and the rest of the article, I’m going to assume it’s in /srv/redmine

Copy config/database.yml.example to config/database.yml then edit config/database.yml to include your db setup (under production. You can remove the others)

Copy public/dispatch.cgi.example to public/dispatch.cgi then changes first line to the path of the redmine user’s ruby location (/home/redmine/.rvm/bin/ruby in my case)

public/dispatch.cgi needs to have execute permissions. If it does not, type: chmod 755 public/dispatch.cgi

Uncomment NV[‘RAILS_ENV’] ||= ‘production’ in config/environment.rb

Now we need to setup MySQL access. Below are four (4) commands that will do all this including building the MySQL gem. Please note the path to mysql_config. Make sure this matches your setup!

rake generate_session_store
gem install mysql -- --with-mysql-config=/usr/bin/mysql_config
RAILS_ENV=production rake db:migrate
RAILS_ENV=production rake redmine:load_default_data

If any of these fail, something may have gone wrong with RVM or MySQL. Check you meet the minimum qualifications listed on Redmine’s website and your paths are correct.

Setup Passenger

Passenger is designed to run as an apache module to keep Ruby of Rails running. If Redmine isn’t used for a while, Ruby of Rails may stop running, it’s not a big deal, it just means it will take a second longer to access your first request. It’s easy to setup, and can be done as the redmine user. So make sure you are still logged in as your redmine user.

I’m running version 3.0.11 or Passenger, you are welcome to do the same. There are only three (3) simple steps involved. So I put them below. Just give it some time to build, it can take a few minutes.

wget http://rubyforge.org/frs/download.php/75548/passenger-3.0.11.tar.gz
tar zxf passenger-3.0.11.tar.gz
./passenger-3.0.11/bin/passenger-install-apache2-module

Once the build finishes there are some lines you need to add to your apache.conf file. They are listed above, they are easy to see. Now, depending on your Linux distro, there are several names and locations for this file. You will need root access to edit the Apache config.

At this point you can stop being logged in as the redmine user. Go back to being root (or your regular user with sudo access)

Setup Apache

This setup worked well for me, I would recommend reading up on Apache config options at http://www.redmine.org/projects/redmine/wiki/HowTo_configure_Apache_to_run_Redmine

The page is a little hard to understand when talking about mod_fcgi and mod_fastcgi. You do NOT need them. They maybe faster, but I find that mod_cgi works just fine.

I’m getting a bit lazy here, and I don’t feel much like going into a lot of explanation on all the options you can use in Apache. Below is a sample of what I used.

<VirtualHost *:80>
   ServerName redmine.<YOUR-DOMAIN>.com
   ServerAdmin webmaster@<YOUR-DOMAIN>.com
   DocumentRoot /srv/redmine/redmine/public/
   ErrorLog /srv/redmine/redmine/log/redmine_error_log
   <Directory "/srv/redmine/redmine/public/">
      Options Indexes ExecCGI FollowSymLinks
      Order allow,deny
      Allow from all
      AllowOverride all
   </Directory>
</VirtualHost>

Obviously there are changes you need to make, like ServerName and ServerAdmin. Note how all the directories start with /srv/redmine/, Update it to where you extracted the Redmine program.

All done!

At this point you should just have to restart apache and you are good to go! Assuming you actually read the Redmine documentation, you can now login as admin (password admin) and give it a go. The first thing I recommend doing is creating a new Admin Level User and removing the default admin. If you get an Internal Error 500 when trying to add a new user, then something is definitely wrong. Check the redmine_error_log and production.log file (both should be in the same directory). If you see something about an error with US_ASCII, then Ruby is not running out of the redmine user’s home directory. Go back through and double check your settings.

I have been told that creating the redmine user in the fashion shown above can create a security risk. As root open /etc/shadow in your favorite editor. At the bottom of the list will be the redmine user. You may see something like:

redmine:!:12585:0:99999:7:::

If you change the exclamation point to an asterisk, it disables the account. That way you can not log into it remotely. Also, if you really want to play it safe, you can edit /etc/passwd also. Just change the last part of the file from /bin/bash to /bin/false. However, by doing this you will not be able to login, or su to that user.

Well?

Did this guide work for you? Do you have any suggestions that may work better? I would love to hear! Feel free to post a comment and let me know how it worked for you, and let me know what Linux distro and version you are running. Thank you.

Apache looking for .htaccess in the wrong places – Fixed!

Is Apache looking for a .htaccess file in all the wrong places? Maybe you have an area where one doesn’t even exist, nor should it. Do you get a message such as:

Permission denied: /srv/http/domain/files/images/.htaccess pcfg_openfile: unable to check htaccess file, ensure it is readable

If you are, you may be wondering why apache is looking for a .htaccess file in the images sub-folder. You may even be wondering why it is asking for one at all because you don’t even use .htaccess file anywhere. Turns out there is a very simple fix.

The problem has to do with file and directory permissions on the server. First off we need to check permissions, here is a fake directory tree for an example.

-rw-r--r--  1 root root    72K 2006-09-30 17:06 file1.htm
drw-r--r--  2 root root   4.0K 2007-05-09 11:52 images/
-rw-r--r--  1 root root    72K 2006-09-30 17:06 index.htm
-rw-r-----  1 root root    625 2010-10-17 14:25 news.php
-rw-------  1 root root    598 2010-10-17 14:25 stuff.php
-rw-r--r--  1 root root     56 2008-03-23 13:42 stuff2.php

See how everything is owned by root? Sometimes this is OK, but for some users it is not possible. Find out from your service provider if you need to use another name, such as apache, or your login user name. For me, I like having everything owned by root. That way other programs or users on my server can’t edit my files.

Look at the images/ directory. It’s permissions are wrong. It turns out Apache wants the directory to be executable. Currently the directory has read-write on user, read on group, and read on world level permissions. We need to make is rwx-r-xr-x, or read-write-execute on user, read-execute on group, and read-execute on world levels.

chmod 755 images/

That should do it. Did you see any other problems with the directory tree above? I actually put 2 more mistakes. They are news.php and stuff.php. Chmod them both to 644. Then they will have the same permissions as index.htm.

If you are like me and want to set the following permissions for everything. I have an easy way of doing it.

-rw-r--r-- for files
drwxr-xr-x for directories
chmod 644 * -R
find . -type d -exec chmod 755 \{\} \;

When complete you will get a list like this.

-rw-r--r--  1 root root    72K 2006-09-30 17:06 file1.htm
drwxr-xr-x  2 root root   4.0K 2007-05-09 11:52 images/
-rw-r--r--  1 root root    72K 2006-09-30 17:06 index.htm
-rw-r--r--  1 root root    625 2010-10-17 14:25 news.php
-rw-r--r--  1 root root    598 2010-10-17 14:25 stuff.php
-rw-r--r--  1 root root     56 2008-03-23 13:42 stuff2.php

That will do it. Keep in mind that depending on your configuration this may not work, but I hope it does. If this did work for you please drop a comment to let others know. Thank you, and good luck!

Secunia PSI is a must for any Windows machines

Keeping up with program patches and updates can be extremely difficult, but thanks to your friends over at Secunia, those problems can be all but eliminated! This is a (somewhat) complete guide on getting Secunia PSI (Personal Software Inspector), installing, and running it! This program is a must for anyone who runs any Windows OS. This is partly because it’s only available for Windows. These images were taken from a Windows 7 Home Premium 64-bit OS, but it should be pretty much the same for any other OS.

At the time of this writing Secunia PSI was on version 1.5.0.2.

First, lets get Secunia PSI downloaded. Head on over to Secuina.com and look for the download button.

this is an image

After downloading head over to where ever you saved it to, and double-click to run. NOTE: Windows may ask is you want to run the program, click yes!

Now follow the instructions. Images below will help guide you through the process.

Select a language.
this is an image
Click Next
this is an image
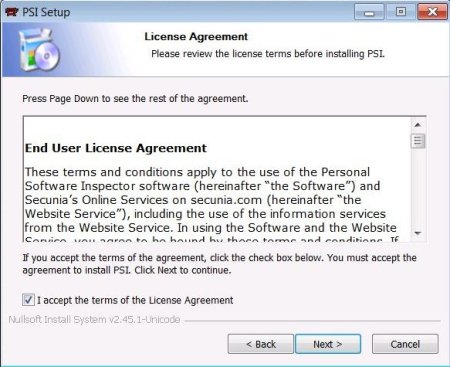
I accept the terms of the License Agreement (Don’t forget to read it!)
this is an image
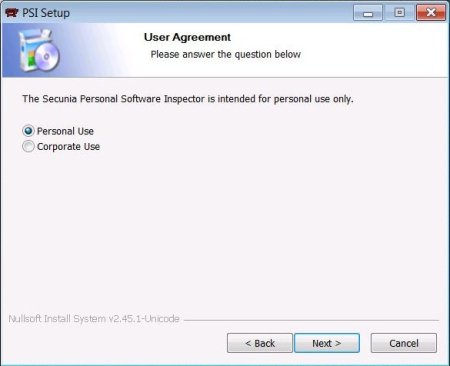
Select Personal Use, unless you are using it for business purposes.
this is an image
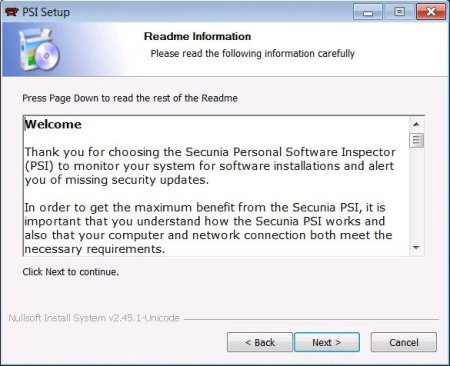
More reading
this is an image
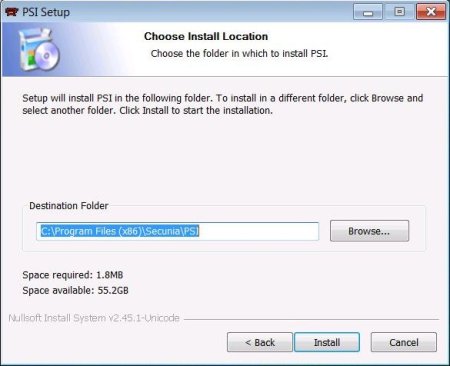
Tell it where to install
this is an image
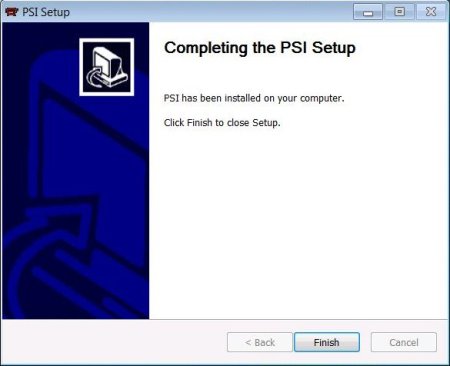
Once done, click finish
this is an image
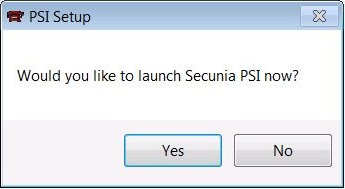
It will ask if you want to run it. Say yes.
this is an image
Once it starts you may see message saying “Please wait while network connectivity is verified.” Have no fear, this is normal. As soon as the program can see the servers it will continue. If you have a software firewall installed you may need to allow Secunia PSI access to the Internet.

Now onto usage!

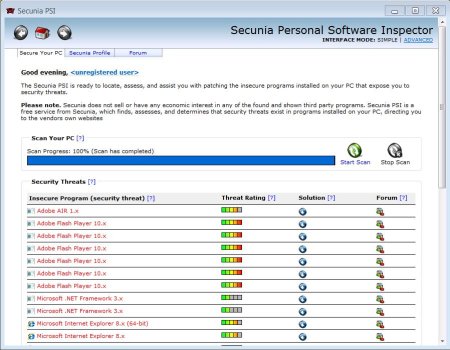
After the program scans it will come up with a list like this. This image is a good scenario (of a bad situation), you may get one just like it or worse. If the insecure program is listed as a Microsoft product it should be dealt with by using Windows Update. I did not include how to do this because it varies from XP, Vista, and 7.
this is an image

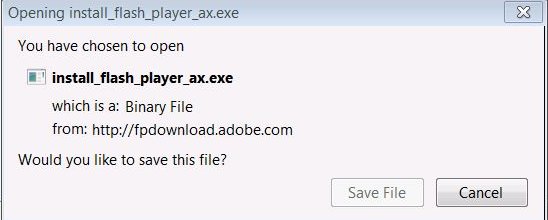
Here I’m going to update Adobe Flash Player 10.x. I click on the Blue down arrow, I get a dialog box to download the new software.
this is an image

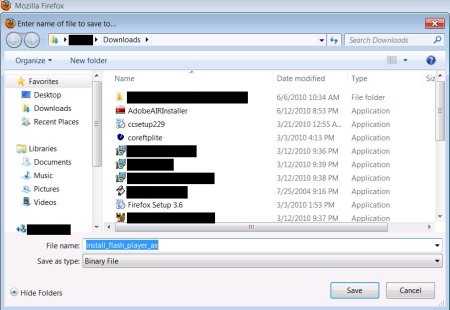
Save the file (remember where you save it to!)
this is an image

Then run it! Just follow the steps for each program. In this case there were many listings for Adobe Flash Player. You only need to download it once and run it once. Once you scan again it will show them all fixed up. (FYI: The reason it lists many copies is because Flash Player is installed in several places due to different web browsers)
this is an image

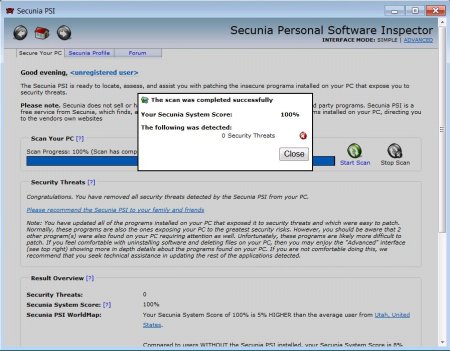
After you do this a few times and run windows update you can manually start the scan again. Once you are set you will see something like this.
this is an image

You are set! Look at you! You have already mastered this awesome utility!

By default Secunia PSI is set to run at system startup. This may not be best if you are on a laptop, or have a very slow computer. If Secunia PSI is running you will see a little icon in the bottom left corner of your screen. It looks a little like this.
this is an image

Questions?

Use SSH Keys Instead of Passwords

I have been living and working in SSH environments for quite some time now. I even created a little bash script to help me keep track of all my connections. Today I wanted to talk about a new way (well, it’s not really new, but new to me I guess) of connecting to other Linux systems by using keys instead of passwords.

Normally when you open an SSH connection you are presented with a password request. The down side to using passwords is that if your not paying attention you can be hit with a brute force or dictionary attack. Because you allow passwords to be used there is a chance of someone gaining access. With keys only you have nothing to fear from these types of attacks.

Here is how it works. Normally you enter a password. With keys all you need to do is form the SSH connection and the keys transmit automatically. Once the keys are paired you are connected with a shell. There are two different ways of performing key pairs. The first way is just the key. No need for a passphrase. The other is a passphrased key. I will talk about both.

First is the “no passphrase key.” In this example you will create a key, upload it to the host, then every time you connect you will not be asked for a password or passphrase. Keep in mind that by doing this there are risks involved. More on that later.

To make a “no passphrase key” you need to generate a key pair. The simplest way of doing this is:

ssh-keygen -t rsa

When it asks you for the password just hit enter. You will get an output of something like this.

Generating public/private rsa key pair.
Enter file in which to save the key (/home/user/.ssh/id_rsa):
Enter passphrase (empty for no passphrase):
Enter same passphrase again:
Your identification has been saved in /home/user/.ssh/id_rsa.
Your public key has been saved in /home/user/.ssh/id_rsa.pub.
The key fingerprint is:
52:b8:d4:fd:d3:f6:ef:46:d1:90:42:de:e2:94:f4:09 user@localhost
The key's randomart image is:
+--[ RSA 2048]----+
|           .E  . |
|       o . o.=o. |
|      o o . =.+..|
|     . o   + o ..|
|      o S   + o .|
|       .     o ..|
|               ..|
|                o|
|               oo|
+-----------------+

NOTE: These are test keys I generated, they won’t work after today.
This created two files. “id_rsa” and “id_rsa.pub”

Take the id_rsa.pub file and upload it to the remote system. There are several ways of doing this. You can use scp, or if you are already connected you can copy and paste the contents of the file in pico, nano, vi, vim, what ever your favorite editor it. Be sure if you use the copy and paste method you keep the entire key in one line!

For scp type:

scp id_rsa.pub @:/.ssh/

This will upload the pub file to the remote host. Once uploaded, login then navigate to ~/.ssh (your user’s home directory then to .ssh). Once there look for a file called “authorized_keys” and cat the contents of the pub file to it. If the file already exists type:

cat id_rsa.pub &gt;&gt; authorized_keys

If the file doesn’t exist use only one (1) “>”

For the copy and past method, cat the id_rsa.pub file to display the output. Select it. Login to the remote host. Open authorized_keys in an editor of your choice. Then paste the copied key. Make sure it stays all on one line! If you don’t it will not work. Save the file.

Once one of these two steps for implementing the key file has been completed you are good to go! You can delete the .pub file if you desire.

Now, onto part 2!

Here is where we generate passphrase keys. It’s basically the same task. When you generate a key put in a passphrase! Remember the passphrase. It is very important. Now when you login you will be prompted to enter you passphrase. This will unlock the key to be used for the connection. It should be different from your normal password.

Now, a few more little notes I want to talk about.

The problem with no passphrase keys: Without the need for a key is someone gains access to your system (like a laptop) they can gain access to any system you authorized that laptop to connect to. With passphrased keys you must type in a passphrase to authorize the key.

If you have problems make sure your ssh config is set to allow keys! Refer to your distro’s help files for more information. In the config you can also disallow passwords all together. The only way to login would be with the use the keys. The down side is if you lose your local key. If you do this method, ensure you have a backup plan. Like another computer with access keys. In Slackware Linux the lines to look for are in /etc/ssh/sshd_config

PubkeyAuthentication yes
AuthorizedKeysFile      .ssh/authorized_keys
PasswordAuthentication no

Note that it becomes a pain if you generate multiple keys for multiple machines. There are ways of doing it, but it adds longer lines to your ssh commands. You can use the same .pub file on any other remote machine you wish to connect to. I don’t know for sure if it would be considered bad practice to do so, but I don’t see what problems would truly arise.

What’s the true benefit to this instead of saving time typing a password? Security. If an attacker can’t use a password (since many users passwords are weak) it would essentially eliminate their ability to gain SSH access. What do you think if the likelihood of the attacker to guess your key. Look at id_rsa. It’s a pretty big key to guess.