Tetherbot, Android, and Slackware How to
After trying to get my Android (aka, T-Mobile’s G1) working on my Slackware laptop and having many problems I looked for help at androidcommuinity.com. Even tho they didn’t technically help me solve the problem they were still a great help, and there quick replies kept me thinking of what the problem could be, and I thank them for that. In the end it was my own fault. Here’s the story.
My laptop runs Slackware 12.0 with a new custom 2.6.28 kernel and there was were the problem was. As it turns out I failed to turn on and modularize certain USB functions, now I’m unsure of what I enabled that made it work.
First, if you think it’s a problem with your kernel check your USB device settings. I use the make menuconfig when I build kernels, if you use xconfig it may appear slightly differently.
Check under Device Drivers –> USB Support. I turned on just about everything and modularized just about every USB device, don’t forget to turn on USB Gadget Support I turned on the top 3 options, they are for debugging and also Serial Gadget was modularized. Click Here to download my .config file. This file is in the root of where you extracted your kernel (usually /usr/src/linux-2.6.28/). Be sure to rename the file from DaijoubuKun.Android.config to .config otherwise you will need to tell your kernel to use that file. Quick note: I know I have a lot here that does not need to be turned on, I like large kernels with lots of modules.
UPDATE!
Put your 50-android.rules file in /etc/udev/rules/ and chmod it to 755!
Also in your kernel build make sure you turn on USB debugging mode!!!
If you think your kernel is OK check out graha.ms. There is a lot of the stuff your going to need to know there.
Now, at this point I’m assuming you visited the link above but your Tetherbot still isn’t working. This may be because the commands google gives may not work in Slackware. I wrote 4 lines more designed in Slackware’s udev style. Below are 8 lines. I’m sure you only need one, but it didn’t hurt me none to use all 8, the bottom 4 are mine. Here is my 50-android.rules
SUBSYSTEM=="usb", SYSFS{idVendor}=="0bb4", MODE="0666"
SUBSYSTEM=="usb_device", SYSFS{idVendor}=="0bb4", MODE="0666"
SUBSYSTEM=="usb", SYSFS{idVendor}=="0bb4", MODE="660"
SUBSYSTEM=="usb_device", SYSFS{idVendor}=="0bb4", MODE="660"
SUBSYSTEM=="usb", ENV{DEVTYPE}=="usb", SYSFS{idVendor}=="0bb4", MODE="0666"
SUBSYSTEM=="usb", ENV{DEVTYPE}=="usb_device", SYSFS{idVendor}=="0bb4", MODE="0666"
SUBSYSTEM=="usb_device", ENV{DEVTYPE}=="usb", SYSFS{idVendor}=="0bb4", MODE="0666"
SUBSYSTEM=="usb_device", ENV{DEVTYPE}=="usb_device", SYSFS{idVendor}=="0bb4", MODE="0666" |
I know it’s got to be overkill to have 8 lines in there, so if you figure out which is the one that works post it in a comment and I will edit this to show that line with credit to you.
NOTE: When you plug in your phone you will be asked if you want to mount the sdcard to your computer. SELECT NO! According to rynosaur of androidcommunity.com.
Note, to make things easier copy the files is your tools/ directory (from the android sdk) to /bin. This way you do not need to go to the download directory to run the adb program. You can also copy the libs to /bin/lib
Now run adb devices. You should get some out put like
List of devices attached HTxxxGZxxxxx device |
If you do then we are ready to go!
If not did you remember to run on USB debugging?
Start the Tetherbot program and hit Start Socks
Now type ‘adb forward tcp:1080 tcp:1080‘. This will forward and thing you send to ‘localhost:1080’ to the phone.
Using nmap I found that Tetherbot uses socks 5 with no authentication. This makes things a bit easier. Once you have gotten this far you are ready to setup your web browser to use the socks proxy. I have done this in SeaMonkey and Firefox (haven’t tried anything else yet) so here are the instructions for FireFox 3.0.x (should stay about the same for future versions).
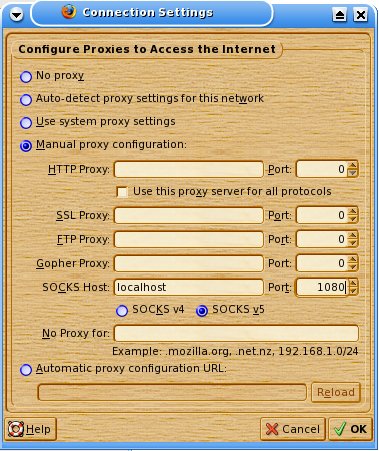
Go to Edit –> Preferences –> Advanced (top tab) –> Network (lower tab) –> Connection Settings (button).
Select ‘Manual Proxy configuration‘ and put localhost in SOCKS Host and port 1080 in port. ONLY put that information in the SOCKS Host! Do NOT put it in HTTP Proxy! Be sure to select Socks v5 and (this may not be necessary) remove anything in the field No Proxy for:
Here is a picture:
Once you do that everything will go through your phone. I did read that there is a 1GB per month limit on the phone. I do not know if this is true or not. I’m only going to use Tetherbot when I’m doing a service call, I need a file and there is no other way to get online.
Lastly, just as quick bit of info. I live in an area where T-Mobile doesn’t have 3G! It sucks, but I’m told it’s coming later this year. It damn well better with how much I pay every month for this thing. I ran a bandwidth test through the EDGE network (it’s like 2.5G) and below is my speed.
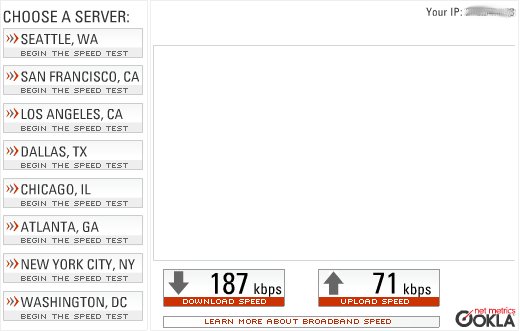
Granted, I only ran the test once, and early in the morning. Plus I don’t think the phone was designed to have these sort of things run through it, but it will have to do for now. P.S. Thanks for the awesome speed test program Speakeasy.
Special note: I could be wrong, but it seems that after you put the required information into 50-android.rules you may need to either restart or run /etc/rc.d/rc.udev restart to restart the udev service. You may also need to replug in your phone, make sure you don’t mount your sd card as it may cause tetherbot to not function properly.
If this helped you in anyway please let me know. If it didn’t help post your problem and I will try to help.